![The Ultimate Guide to Tableau Snowflake Integration [2026]](https://improvado.io/5a1eb87c9afe1000014a4c7d/6838d93b4d20197f36565137_6112ef67ff7f5e1e9a9942fc_Cover%2520(10)%2520(1).png)
Connecting Tableau to Snowflake is a core analytics architecture decision. Snowflake delivers scalable storage and high-performance compute. Tableau provides interactive data visualization on top of governed datasets. Together, they enable structured, warehouse-driven analytics.
This integration supports complex queries on large datasets with minimal latency. It allows teams to build dashboards directly on warehouse data without data extracts or duplication. However, performance, security, and cost control depend on proper configuration.
This guide explains how to connect Tableau to Snowflake, optimize performance, and implement best practices for scalable analytics workflows.
Key Takeaways:
- Combining Snowflake's scalable data warehousing with Tableau's intuitive visualization creates a top-tier analytics stack for any organization.
- You can connect Tableau and Snowflake manually through native connectors or automate the entire pipeline using an ETL/ELT platform for greater efficiency and reliability.
- Optimizing the integration involves choosing the right connection type (Live vs. Extract), configuring Snowflake virtual warehouses correctly, and writing efficient Tableau queries.
- Implementing robust authentication methods like SSO and OAuth is critical for protecting sensitive data and ensuring secure access.
- Automated solutions handle data extraction, cleaning, and normalization. This frees up your analysts to focus on generating insights, not managing data pipelines.
Why Integrate Tableau and Snowflake? The Power Duo for Modern Analytics
Modern analytics requires separation of storage, compute, and visualization. Snowflake handles scalable data processing. Tableau handles interactive analysis. Together, they create a warehouse-centric analytics model.
This architecture supports large datasets, concurrent users, and complex queries without duplicating data across tools.
Snowflake: Elastic Compute and Centralized Storage
Snowflake separates storage from compute. Compute clusters scale independently based on workload. This allows high concurrency without locking or performance degradation.
Teams can isolate workloads by department. Marketing queries do not affect finance dashboards. Storage scales automatically. Compute can be paused when not in use.
Snowflake supports semi-structured data such as JSON. This enables integration of event streams, campaign data, and application logs into one governed environment.
Tableau: Direct Query and Interactive Analysis
Tableau connects directly to Snowflake using live queries. Dashboards operate on current warehouse data without extracts.
Users can build visualizations through structured datasets and governed views. Query pushdown ensures heavy computation happens inside Snowflake, not in Tableau.
This reduces data duplication and improves version control. Metrics remain consistent across reports.
Business Impact: Performance, Control, and Consistency
The integration of Snowflake and Tableau delivers:
- Live dashboards backed by warehouse data
- Centralized metric definitions
- Reduced data movement
- Scalable performance under high concurrency
- Controlled access to sensitive datasets
Decisions rely on governed, up-to-date data rather than exported files.
Common Use Cases
- Marketing analytics: Centralize campaign, CRM, and ecommerce data in Snowflake. Use Tableau for cross-channel performance dashboards and attribution analysis.
- Sales operations: Model pipeline, quota attainment, and revenue forecasts using unified CRM and finance data stored in Snowflake.
- Financial reporting: Run variance analysis, P&L reporting, and scenario modeling directly on warehouse datasets.
- Product analytics: Query event data at scale. Analyze feature adoption and user behavior without exporting data to external tools.
This integration establishes a warehouse-first analytics strategy. Snowflake provides compute and governance. Tableau delivers controlled, interactive access to that data.
Understanding the Core Concepts: How the Integration Works
Before diving into the "how-to," it is essential to understand the fundamental concepts that underpin the Tableau and Snowflake integration.
Live Connection vs. Data Extract: Which to Choose?
When you connect Tableau to a data source like Snowflake, you have two primary options:
- Live Connection: Tableau sends queries directly to Snowflake in real time. Every user interaction on a dashboard (like filtering or drilling down) generates a new query. This is ideal for data that changes frequently and when you need the most up-to-date insights.
- Tableau Extract (.hyper): Tableau pulls a snapshot of the data from Snowflake and stores it in its own high-performance, in-memory data engine. Dashboards using extracts query this local file, which can be faster. Extracts must be refreshed on a schedule to get updated data. This is better for reducing the load on Snowflake and for very large, complex dashboards.
The choice between them depends on your specific needs for data freshness, dashboard performance, and Snowflake credit usage.
The Role of Snowflake's Connector for Tableau
Tableau provides a native, optimized connector for Snowflake. This is not just a generic ODBC driver. It is specifically designed to leverage Snowflake's features and syntax.
The connector handles the translation of Tableau's visual queries (VizQL) into efficient SQL that Snowflake can execute. It also manages authentication, connection settings, and data type conversions, making the integration seamless.
Authentication Methods: An Overview
Securing the connection is paramount. Several authentication methods are available:
- Username/Password: The simplest method, but less secure. Best for initial testing or individual use with Tableau Desktop.
- Single Sign-On (SSO): Integrates with your corporate identity provider (like Okta or Azure AD). Users log in with their standard company credentials, providing centralized and secure access management.
- OAuth: A modern, token-based standard. It allows applications like Tableau to access Snowflake data on behalf of a user without storing their credentials. This is highly secure and is becoming the industry standard for cloud applications.
How Tableau Queries Snowflake's Virtual Warehouses
A key concept in Snowflake is the "virtual warehouse." This is the compute cluster that executes your queries. When Tableau sends a query, you specify which virtual warehouse should run it. You can create different warehouses for different teams or workloads.
For example, you might have a small warehouse for ad-hoc analysis and a larger, multi-cluster warehouse for critical executive dashboards. This separation ensures that one user's heavy query doesn't slow down everyone else.
Method 1: The Manual DIY Connection Guide
Connecting Tableau to Snowflake directly is a straightforward process, but it requires careful attention to detail. This section walks you through the steps for setting up a manual connection using Tableau's native connector.
Prerequisites: What You Need Before You Start
Ensure you have the following information and software ready:
- Your Snowflake account URL (e.g., youraccount.snowflakecomputing.com).
- A Snowflake username and password with appropriate permissions.
- The name of the Snowflake warehouse, database, and schema you want to connect to.
- Tableau Desktop, Tableau Server, or Tableau Cloud installed.
- The latest Snowflake ODBC driver installed on the machine running Tableau.
Step 1: Installing the Snowflake ODBC Driver
Tableau requires the Snowflake ODBC driver to communicate with your Snowflake instance. You must download it from the Snowflake Client Repository (repo.snowflake.com) and install it.
- Navigate to the Snowflake repository and find the ODBC driver section.
- Download the correct version for your operating system (Windows, macOS, or Linux).
- Run the installer and follow the on-screen instructions. For Tableau Server, this driver must be installed on all nodes in the cluster.
Step 2: Configuring Snowflake Roles and Permissions for Tableau Users
For security and governance, it is best practice to create a specific role in Snowflake for your Tableau users. Do not use powerful roles like ACCOUNTADMIN for reporting.
Create a custom role (e.g., TABLEAU_REPORTER) and grant it the necessary privileges:
- USAGE on the target warehouse.
- USAGE on the target database.
- USAGE on the target schema.
- SELECT on all tables and views that Tableau will need to access.
Assign this role to the user accounts that will be connecting from Tableau.
Step 3: Connecting from Tableau Desktop to Snowflake
Once the driver is installed and permissions are set, you can connect from Tableau Desktop.
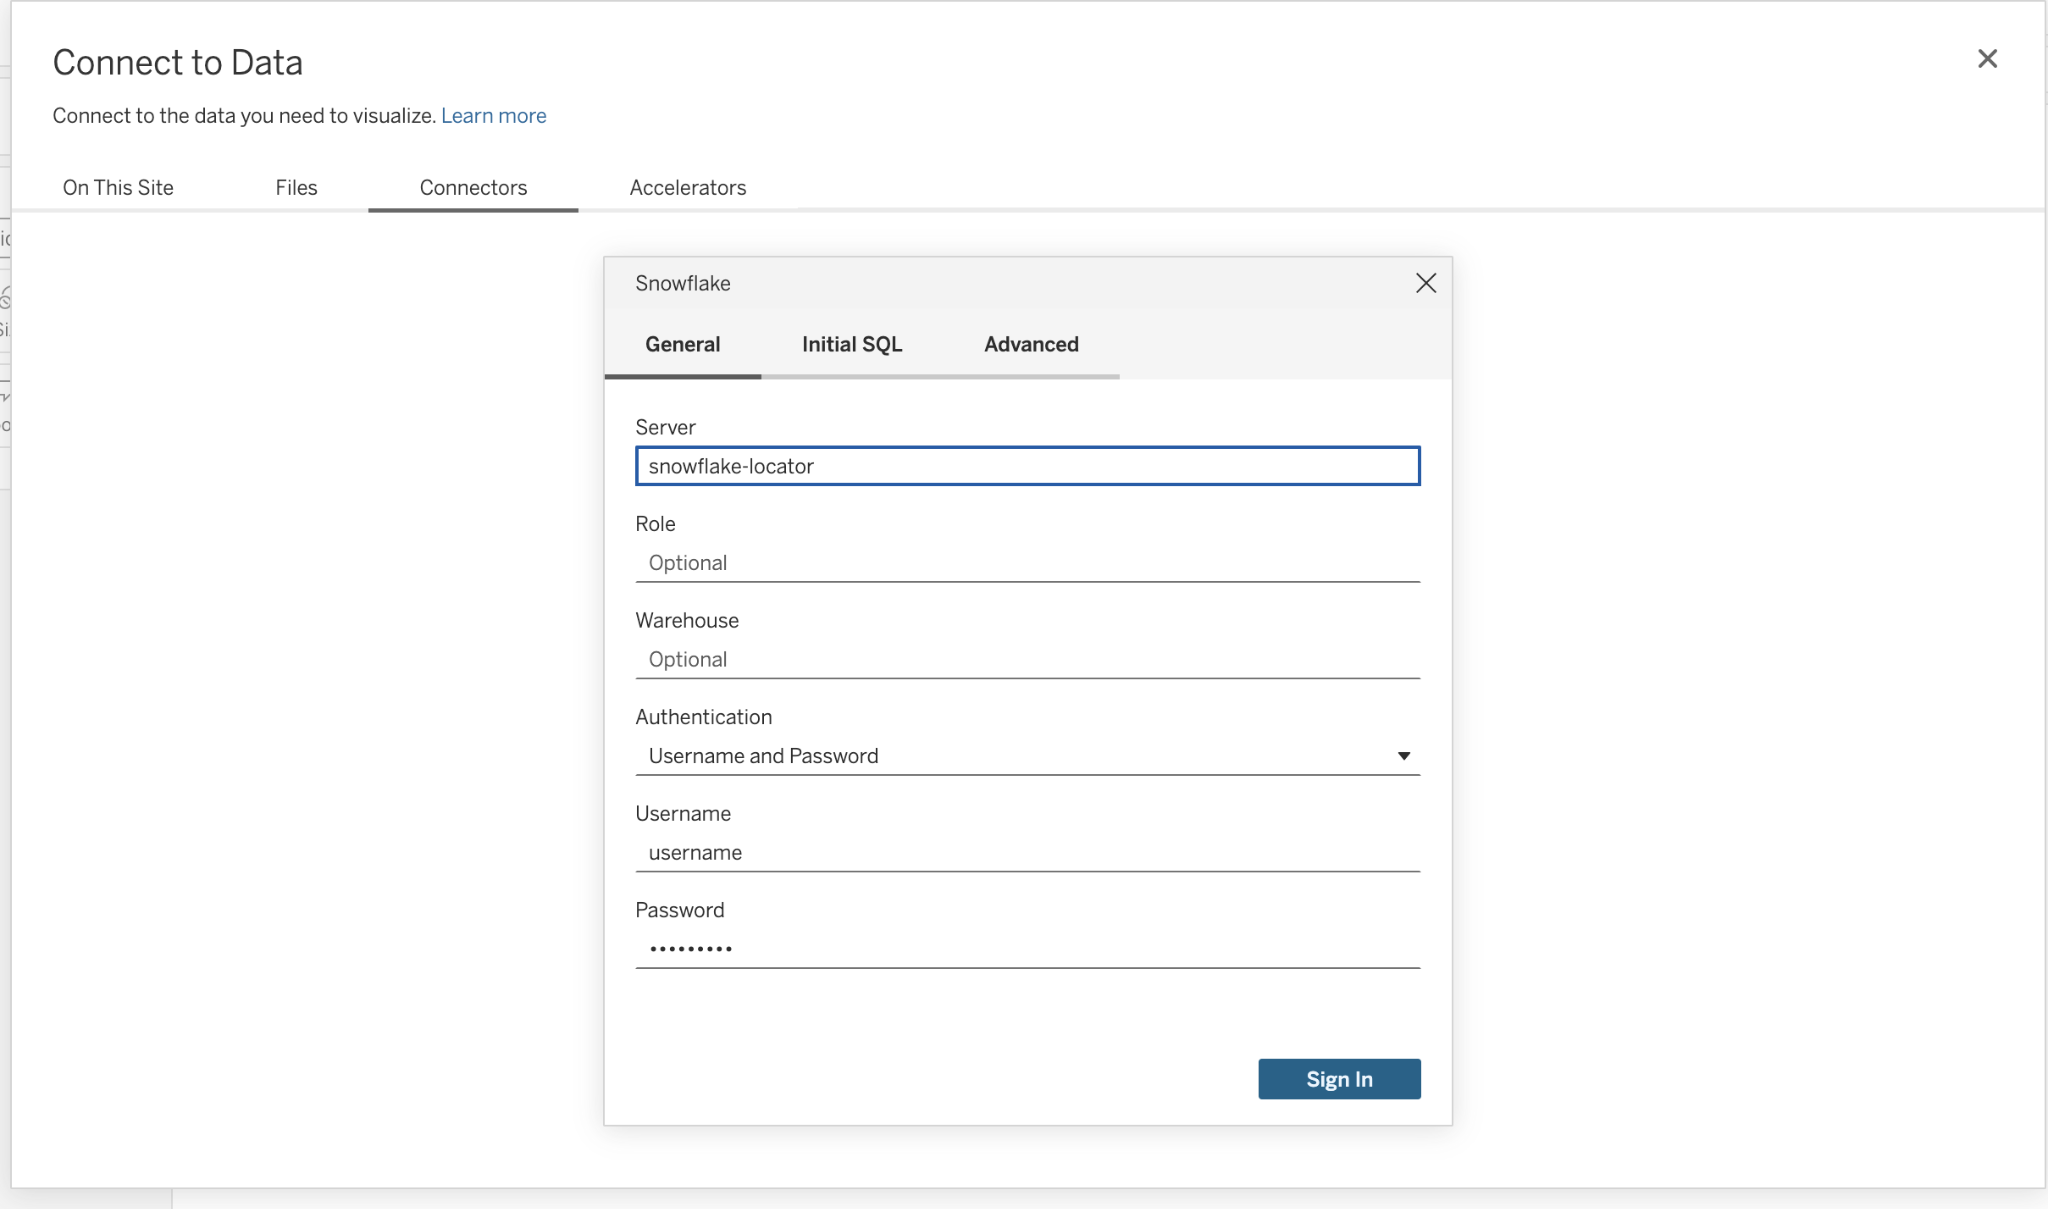
- Open Tableau Desktop and under "Connect," select "Snowflake."
- In the connection dialog box, enter your Snowflake Server URL.
- Choose your authentication method (e.g., Username and Password, or OAuth if configured).
- Enter your credentials and click "Sign In."
- Once connected, select your Warehouse, Database, and Schema from the dropdown menus.
- You can now drag tables from the left pane onto the canvas to start building your data source.
Step 4: Connecting from Tableau Server or Tableau Cloud
To use Snowflake data sources on Tableau Server or Cloud, you publish them from Tableau Desktop. The key consideration is credential management.
- Embedded Credentials: You can save the Snowflake username and password within the published data source. This is convenient for scheduled extract refreshes but less secure.
- Prompt for Credentials: The server can prompt users to enter their own Snowflake credentials. This is more secure and enforces user-level permissions.
- OAuth: If configured, the server uses OAuth tokens for authentication, which is the most secure and seamless method for users.
Advanced Security: Configuring OAuth for Tableau and Snowflake
For enterprise environments, OAuth provides the most secure and manageable way to handle authentication between Tableau and Snowflake. It eliminates the need to store database credentials in Tableau.
What is OAuth and Why Use It for Secure Data Access?
OAuth is an open standard for access delegation. Instead of giving Tableau your Snowflake password, you grant it a secure token. This token gives Tableau permission to access data on your behalf. The key benefits are improved security, as credentials are never shared, and centralized control, as access can be revoked at any time from your identity provider.
Setting Up an OAuth Integration with Okta or Azure AD
The process generally involves creating an "application" or "security integration" within both your identity provider (IdP) and Snowflake.
- In your IdP (e.g., Okta): Create a new OAuth application. You will receive a Client ID and Client Secret. You also need to configure the callback URL, which points to your Tableau Server or Cloud instance.
- In Snowflake: Run a CREATE SECURITY INTEGRATION command. This command links Snowflake to your IdP's OAuth application using the Client ID and Secret you just obtained.
This setup establishes a trust relationship between Snowflake and your identity provider.
Configuring Tableau Server/Cloud for Snowflake OAuth
Next, you configure Tableau to use this new OAuth connection.
- In Tableau Server's settings, go to the "OAuth Clients" section.
- Add a new connection for Snowflake.
- Provide the Client ID, Client Secret, and callback URL that match your IdP configuration.
- Save the configuration. Users can now add their Snowflake credentials to their Tableau profile using this secure OAuth flow.
Managing Refresh Tokens and User Credentials Securely
With OAuth, Tableau stores a refresh token for each user. This token allows Tableau to obtain new access tokens automatically, enabling scheduled extract refreshes and live connections to work without prompting the user every time.
This process is secure and managed entirely within the Tableau platform, providing a seamless experience for end-users.
Method 2: The Automated Approach with an ETL/ELT Platform
While a direct connection is powerful, it places the burden of data preparation and pipeline management on your team. An automated approach using an ETL/ELT platform like Improvado offers a more robust and scalable solution.
Limitations of the Manual Approach
The DIY method has several drawbacks:
- High Maintenance: API changes, schema drifts, and driver updates require constant monitoring and engineering effort.
- Complex Data Prep: Raw data from various sources is rarely ready for analysis. It needs to be cleaned, transformed, and normalized before it can be loaded into Snowflake.
- Lack of Governance: Managing dozens of direct connections can become chaotic, leading to inconsistent data and a lack of visibility.
- Performance Bottlenecks: Poorly structured data can lead to slow queries and dashboards, regardless of how powerful Snowflake and Tableau are.
How Platforms like Improvado Simplify Integration
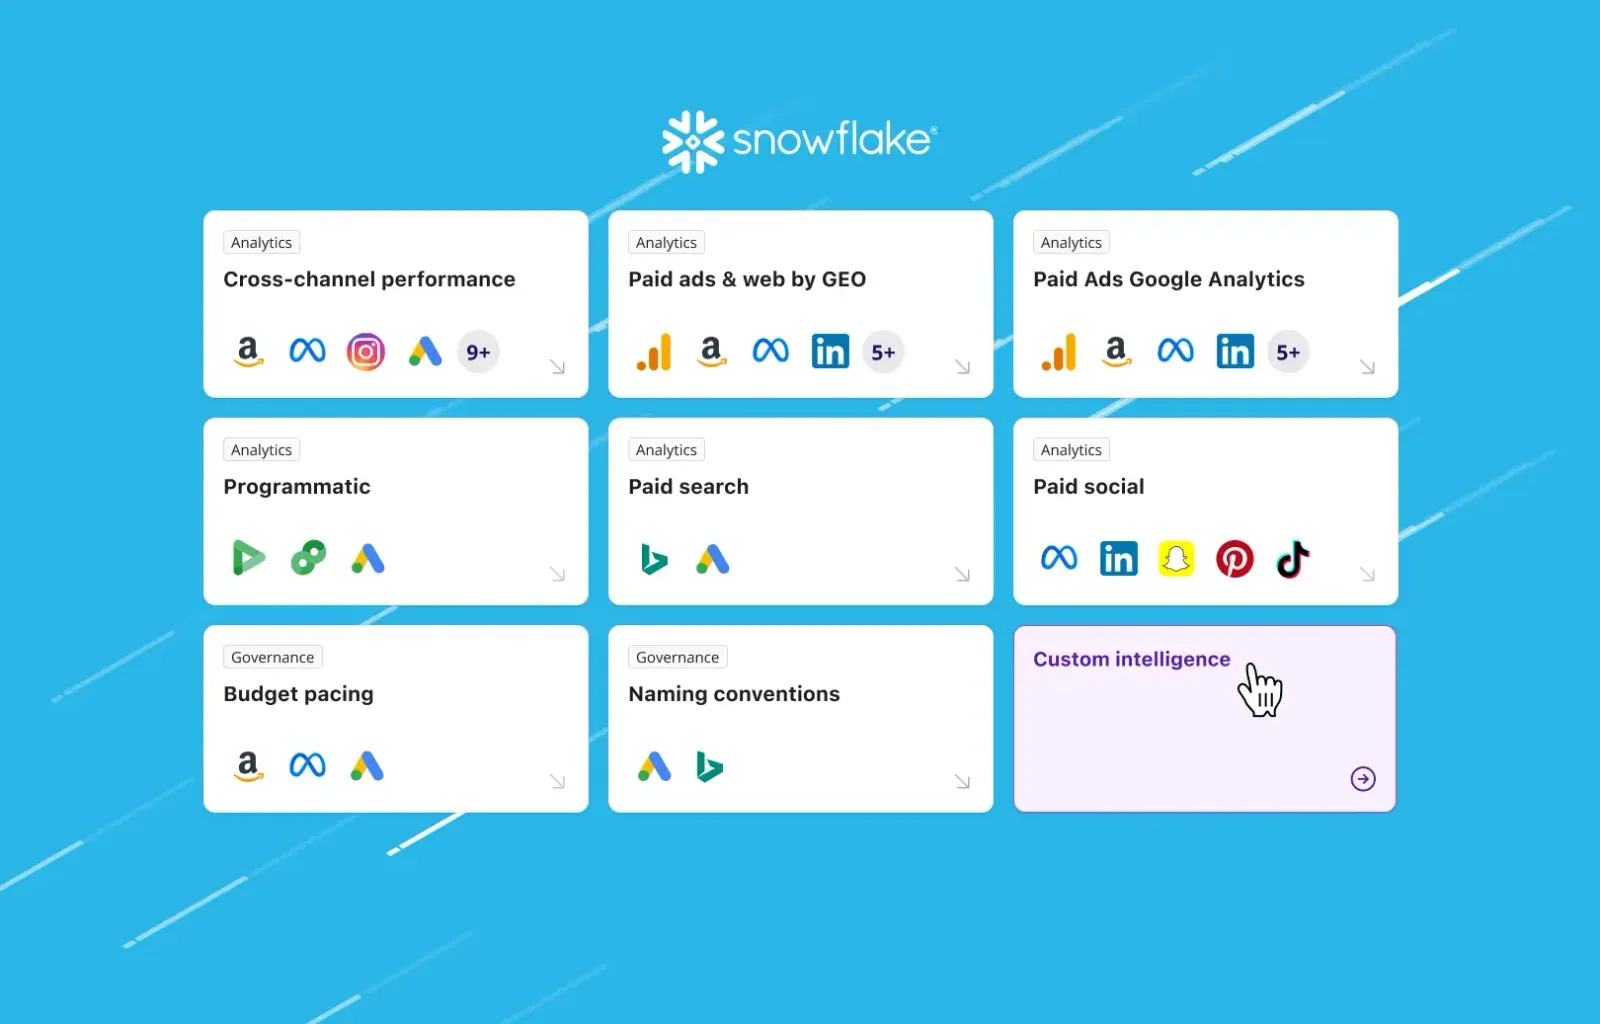
Specialized platforms are designed to solve these problems. They act as a central hub for all your data, automating the entire pipeline from source to dashboard. Various data integration solutions exist to solve this, but marketing-focused platforms offer pre-built connectors and data models.
Improvado handles the complexities of connecting to hundreds of data sources, managing APIs, and structuring the data correctly within Snowflake.
Instead of building and maintaining custom scripts for each data source, an automated platform provides pre-built connectors. You simply authenticate your accounts (e.g., Google Ads, Facebook Ads, Salesforce), and Improvado handles the rest.
The platform automatically extracts the data on a schedule and loads it into your Snowflake instance. This entire ETL process is managed, monitored, and optimized for you.
"The integration between Improvado and Snowflake allows us to unify and analyze our marketing data without any data movement or using any third-party marketing analytics solutions. With real-time visibility into campaign performance and AI-driven insights, we can cut time to insight by 5-10x and optimize for better campaign outcomes—all seamlessly inside the Snowflake AI Data Cloud; without any IT dependencies."

Prepping and Normalizing Data for Analysis-Ready Dashboards
This is where automated platforms like Improvado provide the most value. They don't just dump raw data into Snowflake. Improvado performs crucial data transformation steps.
This includes cleaning messy data, standardizing naming conventions, and joining data from different platforms. The result is a clean, harmonized, analysis-ready dataset. When you connect Tableau to this curated data, building insightful dashboards becomes faster and easier.
| Aspect | Manual DIY Integration | Automated Platform (Improvado) |
|---|---|---|
| Setup Time | Moderate to High (Requires technical setup per source) | Low (Point-and-click connector setup) |
| Maintenance | High (Constant monitoring of APIs, drivers, schema changes) | Zero (Fully managed and maintained by the platform) |
| Data Preparation | Manual (Requires separate scripts or tools for cleaning and transformation) | Automated (Built-in data cleaning, normalization, and mapping) |
| Scalability | Limited (Becomes complex and brittle as sources increase) | High (Easily add hundreds of sources without engineering effort) |
| Expertise Required | Data engineering, SQL, API knowledge | Marketing or analytics knowledge |
| Time to Insights | Slow (Weeks or months to build and stabilize pipelines) | Fast (Data is analysis-ready in hours or days) |
| Data Governance | Decentralized and difficult to manage | Centralized control and visibility over all data flows |
Best Practices for Performance Optimization
A fast, responsive dashboard is critical for user adoption. Even with powerful tools like Tableau and Snowflake, performance can degrade if not configured correctly. Follow these best practices to ensure your integration is lightning-fast.
Choosing the Right Snowflake Virtual Warehouse Size
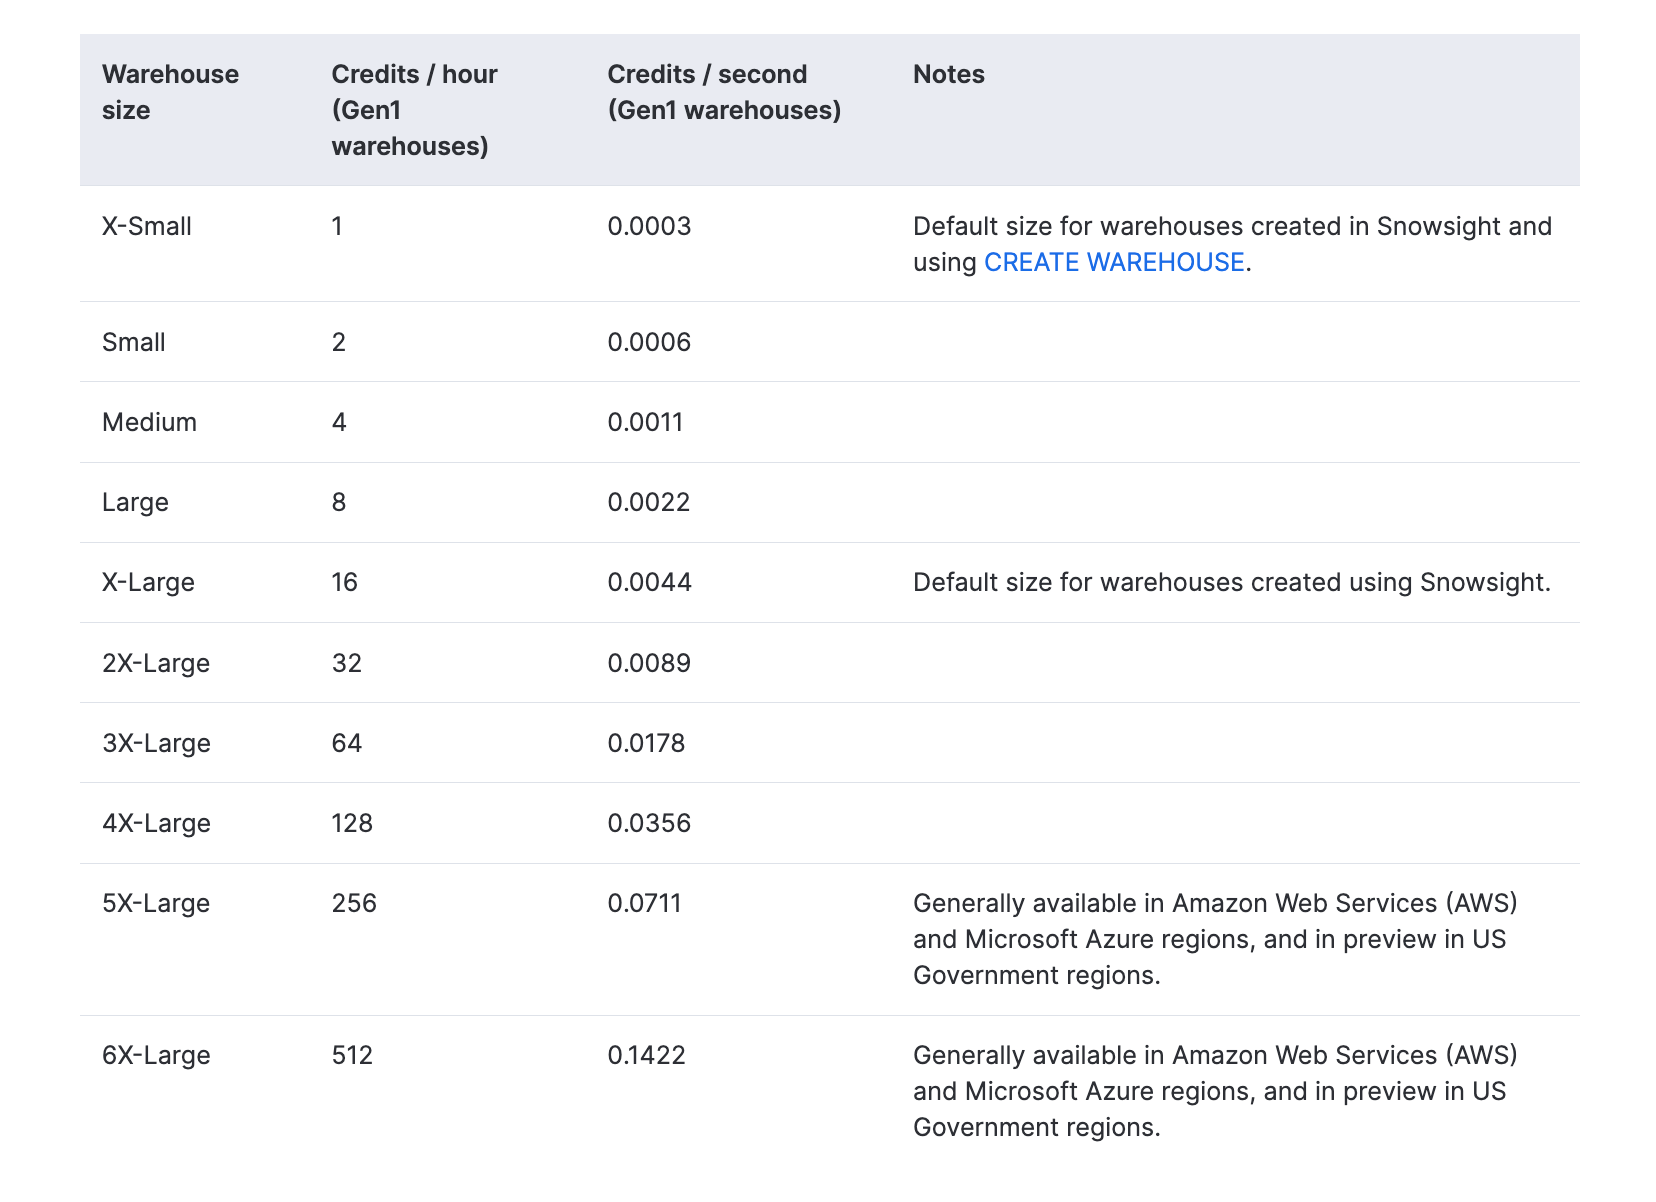
The size of your Snowflake warehouse (X-Small, Small, Medium, etc.) directly impacts query performance. A larger warehouse provides more compute resources. Start with a smaller size and monitor query performance. If dashboards are slow, try scaling up the warehouse.
Also, consider using multi-cluster warehouses to handle high concurrency during peak usage times.
Optimizing Tableau Queries for Snowflake
Tableau's connector is good, but you can help it generate better queries.
- Use filters wisely: Apply filters early in your Tableau data source to reduce the amount of data pulled from Snowflake. Context filters are particularly effective.
- Limit granularity: Only bring the level of detail you need into your visualization. Avoid pulling raw, event-level data if an aggregated view will suffice.
- Avoid complex calculations: Whenever possible, push complex calculations and logic down to Snowflake using custom SQL or by creating views in Snowflake itself.
Using Materialized Views in Snowflake for Faster Dashboards
For dashboards that rely on complex joins or aggregations, a materialized view in Snowflake can dramatically improve performance. A materialized view pre-computes the results of a query and stores them like a table.
When Tableau queries the view, the results are returned almost instantly. This is an excellent strategy for high-demand, low-latency dashboards.
Leveraging Tableau's Performance Recording Feature
Tableau has a built-in Performance Recorder. This tool captures detailed performance information about your workbooks. It shows you exactly which queries are taking the longest to execute.
Use this feature to identify performance bottlenecks and focus your optimization efforts on the slowest parts of your dashboard.
Caching Strategies in Tableau Server and Cloud
Tableau Server and Cloud have sophisticated caching mechanisms. When one user loads a dashboard, the query results can be cached. When another user loads the same dashboard, Tableau can serve the results from the cache instead of querying Snowflake again.
Configure your caching settings to balance data freshness with performance. A longer cache duration means faster performance but less current data.
Data Governance and Cost Management
Integrating powerful data platforms requires a strong focus on governance and cost control. Without proper oversight, you risk data breaches and runaway cloud spending.
Implementing Row-Level Security in Snowflake for Tableau
You can control which users see which rows of data. This is essential for multi-tenant applications or when dealing with sensitive information. Snowflake’s row-level security policies can be combined with Tableau's user functions to create a secure, dynamic filtering system.
This ensures that users only see the data they are authorized to access, directly within Tableau dashboards.
Managing Snowflake Compute Credits from Tableau Usage
Every query in Snowflake consumes compute credits, which translate to cost. Monitor your credit usage closely. Use Snowflake's query history to identify the most expensive queries coming from Tableau.
You might discover that a single poorly designed dashboard is responsible for a large portion of your spend. Consider setting up resource monitors in Snowflake to automatically suspend warehouses if they exceed a certain credit threshold.
Auditing Queries and Monitoring Dashboard Performance
Regularly audit the queries being sent from Tableau. This helps you ensure compliance and identify optimization opportunities.
Use the dashboards and views in Snowflake's ACCOUNT_USAGE schema to track query history, user activity, and performance over time. This proactive monitoring helps you maintain a healthy and cost-effective analytics environment.
The Importance of a Robust Marketing Data Pipeline for Governance
For marketing teams, data governance is especially complex due to the sheer number of data sources. A well-structured marketing data pipeline is the foundation of good governance.
By centralizing data extraction and transformation before it reaches Snowflake, you create a single source of truth. This makes it easier to enforce data quality standards, manage access, and ensure compliance across all your marketing analytics.
Visualizing Snowflake Data in Tableau: From Connection to Dashboard
With a performant and secure connection in place, you can focus on the ultimate goal: creating impactful visualizations. This section covers the workflow for turning your Snowflake data into actionable insights.
Publishing a Snowflake Data Source to Tableau Server/Cloud
Instead of having every user connect to Snowflake individually, it's best to create and publish a centralized data source. An analyst or data steward can build a curated data source in Tableau Desktop, complete with calculated fields, hierarchies, and proper formatting. They then publish this data source to Tableau Server or Cloud.
Other users can then connect to this certified data source to build their own reports, ensuring consistency and a single source of truth.
Building Interactive KPI Dashboards
Tableau excels at creating dynamic, interactive dashboards. When connected to Snowflake, you can build powerful tools for business users.
- Use dashboard actions: Create actions that allow users to filter, highlight, or navigate between sheets. This turns a static report into an exploratory tool.
- Incorporate parameters: Allow users to input their own values to change calculations or switch between metrics.
- Focus on a clear narrative: A good dashboard tells a story. Organize your charts logically to guide the user from high-level summaries to detailed insights. This is key to effective KPI dashboards.
Embedding Tableau Dashboards into Other Applications
You can extend the reach of your insights by embedding Tableau visualizations directly into other business applications, such as Salesforce, SharePoint, or custom web portals. Tableau's
Embedding API allows you to integrate your dashboards seamlessly, bringing data to where your users already work. This is a powerful way to promote a data-driven culture throughout your organization.
Utilizing Tableau's "Ask Data" with Your Snowflake Data Source
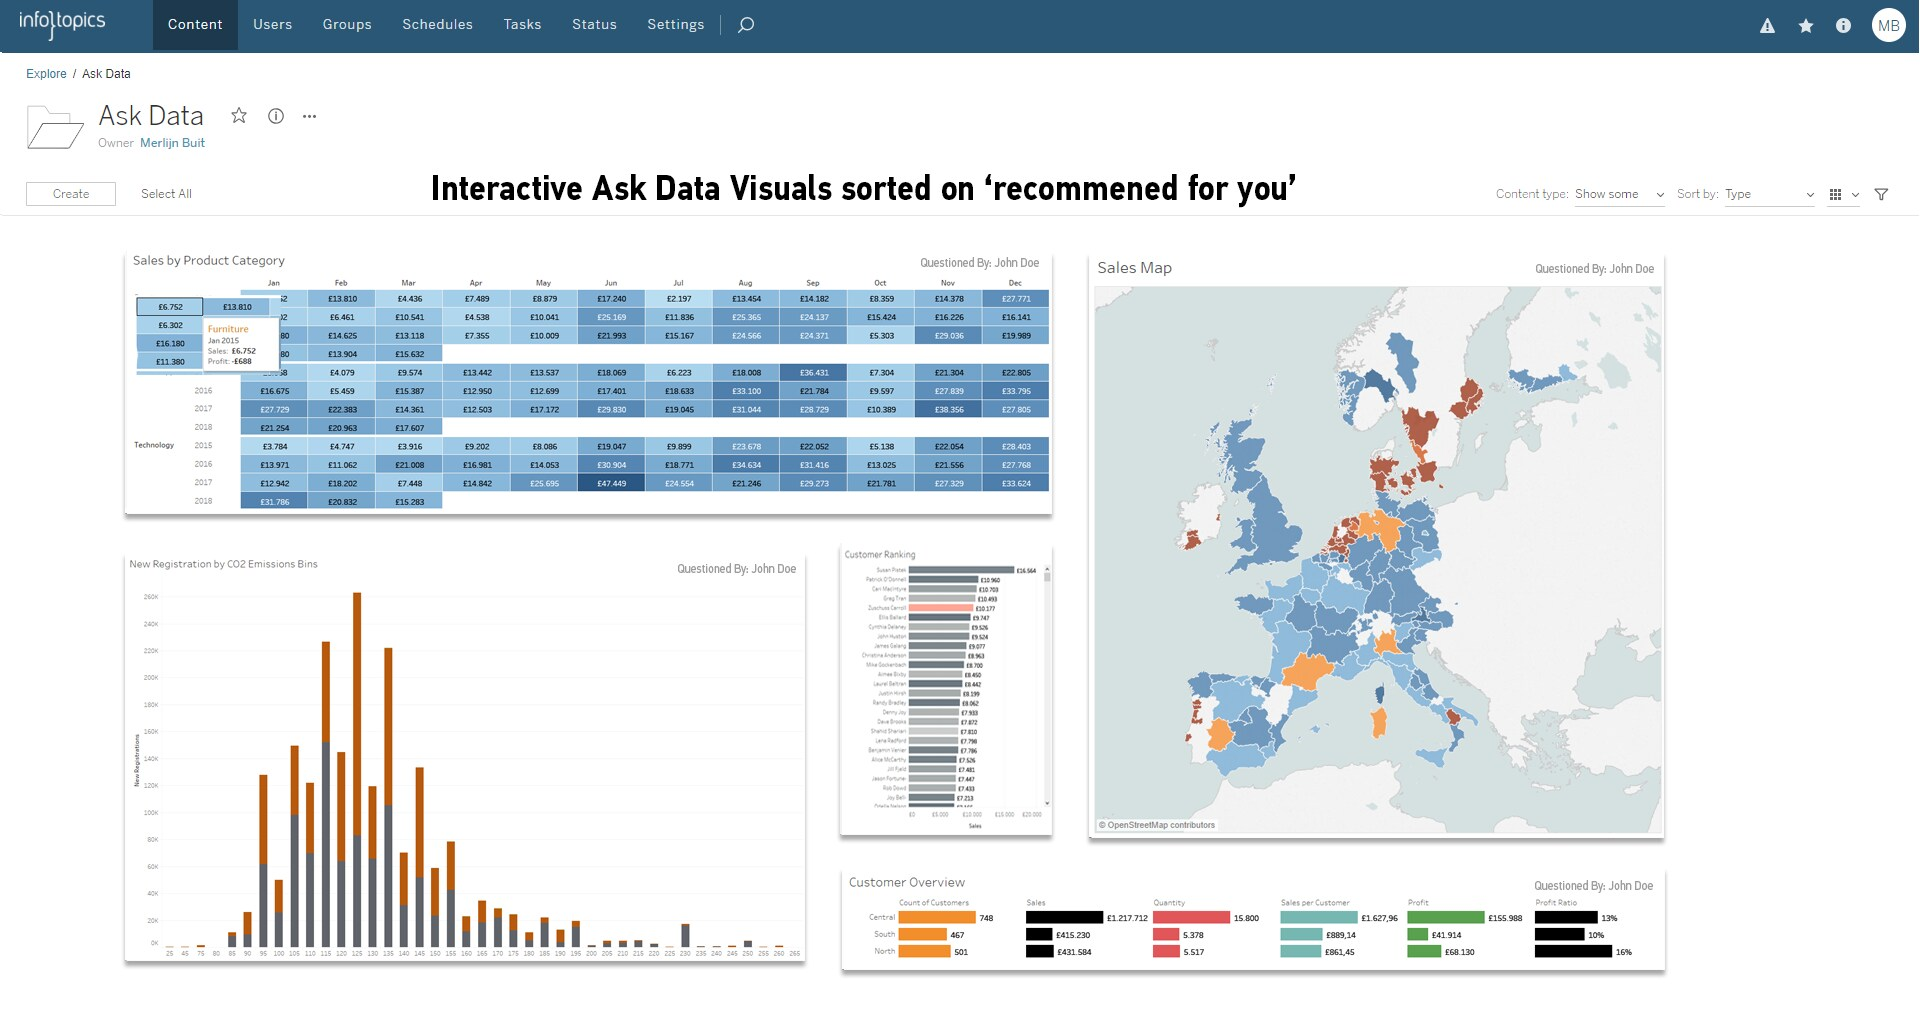
Tableau's "Ask Data" feature provides a natural language interface for your data. Users can type questions like "what were the total sales by region last quarter?" and Tableau will automatically generate a visualization to answer it.
When you publish a well-structured Snowflake data source, you enable your business users to self-serve their own data questions without needing to learn the Tableau interface.
Common Challenges and Troubleshooting Steps
Even with a well-planned integration, you may encounter issues. Here are some common problems and how to solve them.
Resolving "Invalid Username or Password" Errors
This is one of the most common connection errors. Double-check the server URL, username, and password. Remember that Snowflake usernames are often case-sensitive.
Also, verify that the user's role has the necessary permissions on the warehouse, database, and schema you are trying to access.
Debugging Slow Dashboard Load Times
If a dashboard is slow, use Tableau's Performance Recorder to pinpoint the bottleneck. Is it a slow query, complex rendering, or a network issue?
Once identified, you can apply the optimization techniques discussed earlier, such as simplifying calculations, adding filters, or using a materialized view in Snowflake.
Handling Snowflake Driver Compatibility Issues
Always use the latest version of the Snowflake ODBC driver recommended by Tableau. An outdated or mismatched driver can cause unexpected errors or performance problems.
Ensure the driver is installed correctly on both Tableau Desktop machines and all nodes of your Tableau Server cluster.
Managing PrivateLink and Firewall Configurations
If your Snowflake account uses AWS PrivateLink or is behind a strict firewall, you may need to work with your network team. Ensure that the IP addresses of your Tableau Server or Tableau
Cloud instance are whitelisted to allow traffic to and from your Snowflake account. This is a common hurdle in highly secure enterprise environments.
| Aspect | Tableau Live Connection | Tableau Extract |
|---|---|---|
| Data Freshness | Real-time (data is queried directly from Snowflake) | Delayed (data is as fresh as the last scheduled refresh) |
| Performance | Depends on Snowflake warehouse performance and query complexity | Often faster for complex dashboards, as it queries the local .hyper file |
| Snowflake Credit Usage | Higher (every interaction triggers a query, consuming credits) | Lower (credits are consumed only during the extract refresh) |
| Network Dependency | High (requires a constant, stable connection to Snowflake) | Low (dashboards can be used offline once the extract is created) |
| Query Complexity | Best for simple to moderately complex queries | Can handle very complex calculations more efficiently |
| Best Use Case | Operational dashboards, real-time monitoring, data that changes frequently | Strategic dashboards, large datasets, reducing load on Snowflake |
Advanced Use Cases: Unleashing Full Potential
Once you've mastered the basics, you can explore more advanced capabilities that the Tableau-Snowflake integration enables.
Integrating Geospatial Data from Snowflake into Tableau Maps
Snowflake has excellent support for geospatial data types. You can store geographic information like points, lines, and polygons directly in Snowflake. Tableau can then visualize this data on rich, interactive maps.
This is perfect for analyzing sales territories, logistics routes, or customer demographics by location.
Leveraging Snowflake's Semi-Structured Data Support (JSON, XML)
Snowflake can store and query semi-structured data like JSON and XML without requiring a rigid schema. Tableau can connect to this data, allowing you to parse and visualize information from nested JSON objects. This is incredibly powerful for analyzing data from web APIs, IoT devices, or application logs.
Advanced Marketing Attribution with Clean Data
With a clean, unified dataset in Snowflake, you can perform sophisticated analyses in Tableau. Building advanced marketing attribution models becomes possible.
You can move beyond simple last-touch attribution and explore multi-touch models that give you a truer picture of your marketing effectiveness across all channels.
Powering Predictive Analytics with Tableau's ML Features
Tableau's predictive modeling functions (like MODEL_QUANTILE) can run directly on your Snowflake data. You can build forecasts and predictions without writing any R or Python code.
This brings machine learning capabilities to your analysts, allowing them to create predictive dashboards for things like sales forecasting or customer churn analysis.
Conclusion
Integrating Tableau and Snowflake provides a powerful foundation for a data-driven culture. By combining Snowflake's incredible data processing power with Tableau's intuitive visualization capabilities, you empower your teams to uncover valuable insights and make faster, more informed decisions.
We've explored the two primary paths to this integration: the manual, hands-on approach and the streamlined, automated method using a platform like Improvado.
The manual connection offers control but comes with significant overhead in maintenance, data preparation, and security management. For businesses looking to scale their analytics without scaling their engineering team, an automated solution is the clear winner. It handles the complexities of data pipelines, delivering clean, analysis-ready data directly to your BI tool.