Set up data extraction
You can start the configuration of the data extraction in two ways:
- Click on the Extract for the required connection in the connected sources list. If you don’t see the necessary connector in the list, click the Make a new connection button to add it first.
- Click the Extract button on the top right corner of the connection page.
This instruction will help you to set up data extraction in four steps:

Step 1. Select Accounts
You can see all available accounts and their IDs on the left side of the screen and the list of selected accounts on the right. The number in the orange circle shows how many accounts you have chosen.
Also, you can sort them by ascending or descending date added and use the search field to find the necessary account by its name or ID.
The Date added column shows when each account was added to Improvado.
- e.g., when you connect a Business Account to Improvado, it has only two related accounts (in this case, the date added for Business Account and two corresponding accounts will be the same).
- Then you have created one more account inside the Business Account via the connected platform. It is added to Improvado automatically, so the date added for a new account will differ from that of other accounts.
Recently added accounts are shown first by default. That allows you to find the necessary accounts faster.
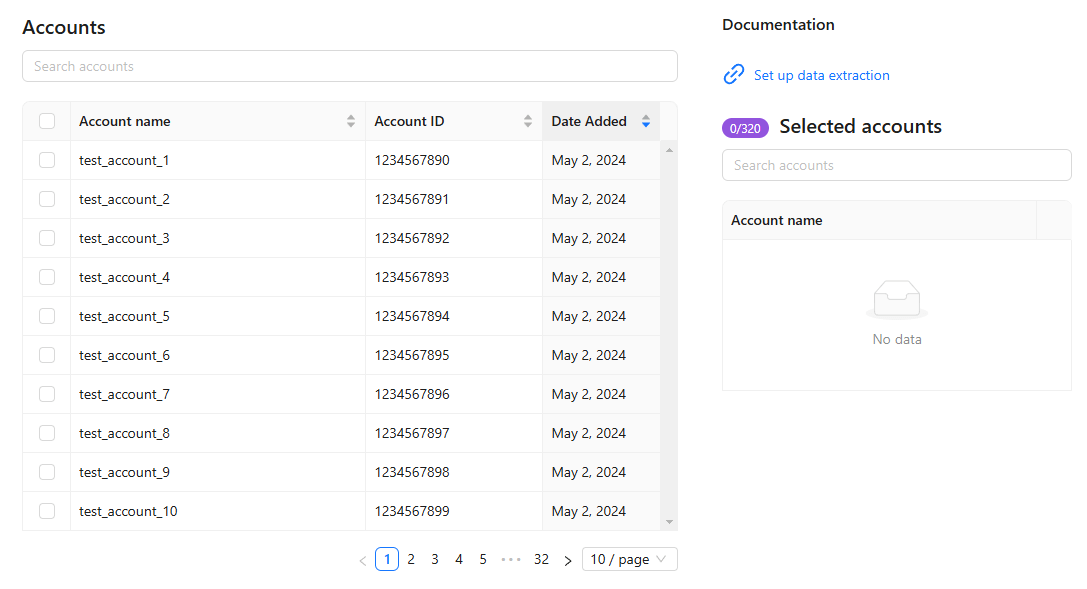
When all the necessary accounts are selected, click the Continue button. This button is non-clickable while the selected accounts list is empty.
Selecting more than 10 accounts for extraction
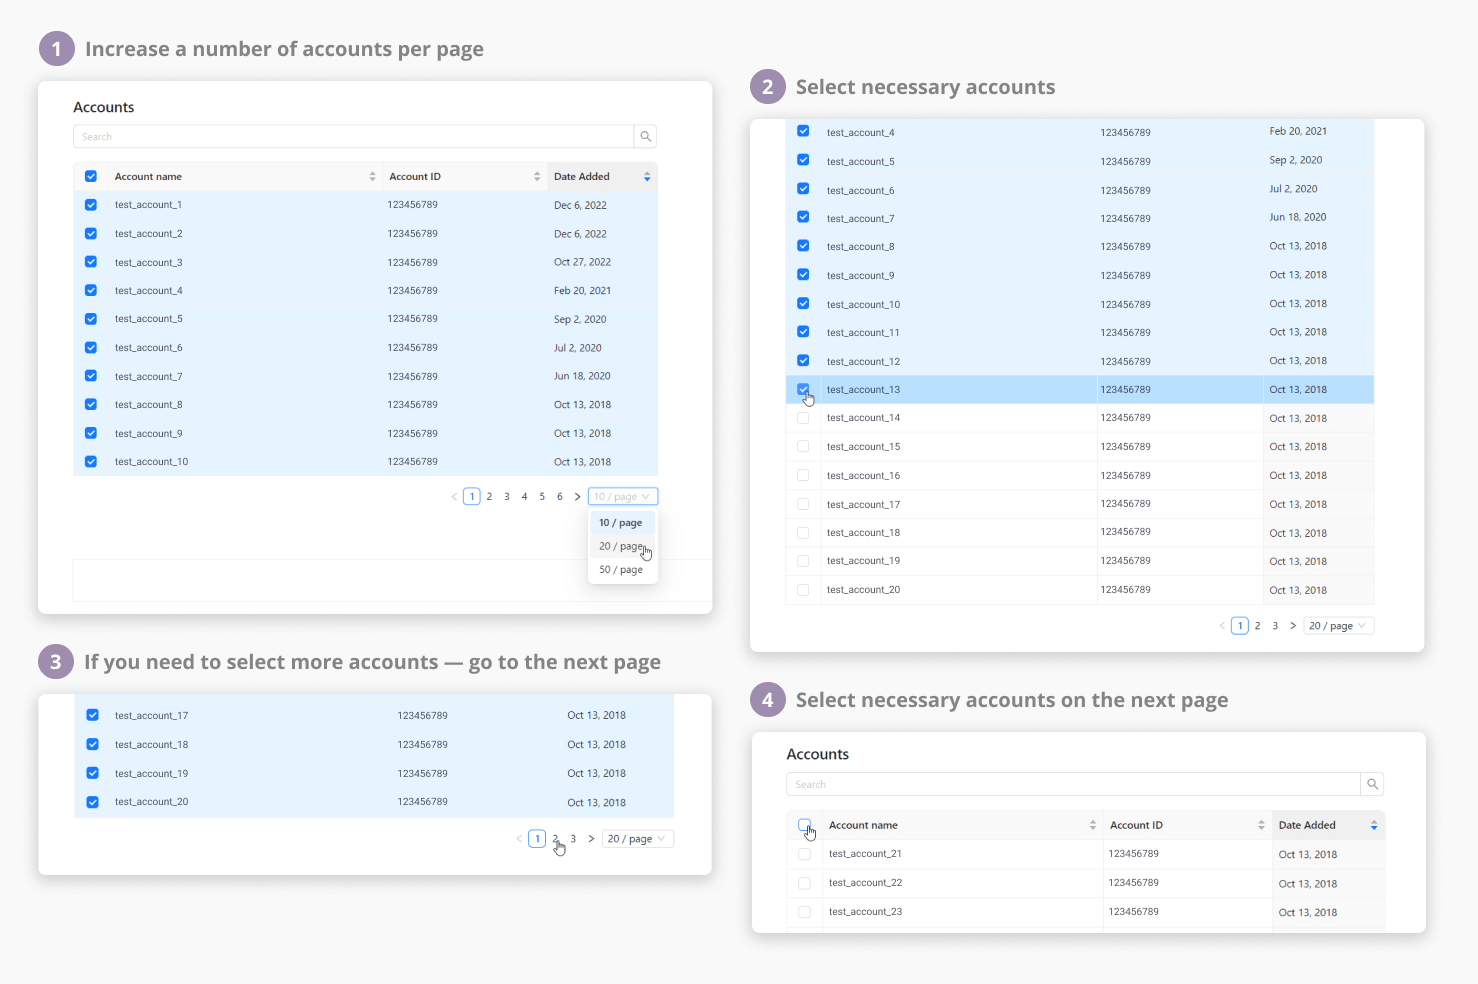
If the list contains more than ten items, pagination settings will appear at the bottom of this list. Using the checkbox in the list header, you can select all accounts on this page. To select more accounts, you can move between pages. Marked checkboxes are saved when moving.
To select more than 10 accounts for extraction, follow the steps from the image below:
Step 2. Choose Extraction Templates
This step is similar to the previous. You can see all available templates, their labels and types on the left side of the screen and the selected templates on the right. The number in the orange circle shows how many templates you have selected.
You have two Configuration options for your Data Extraction:
- The Default Configuration option (predefined data schema) becomes available if you select any Prebuilt labeled template in the list.
- The Custom Configuration option (data schema defined manually) becomes available if you select any Custom labeled template in the list. Custom Configuration is only available if the Data source you’ve selected for the Dat Extraction has at least one available Custom Report type.
In this documentation, we will cover Default Configuration flow. You can learn more about Custom Configuration here.
.png)
You can use type filter to see only global or custom templates and label filter to see only prebuilt or custom extraction templates. Also, you can sort the data ascending or descending and use the search field to find the necessary template.
Extraction templates filter
Suppose you know the fields you want to see in extracted data. In that case, you can find the relevant global and custom extraction templates by properties/dimensions Field Name from Improvado Data Dictionary without leaving the extraction flow using the Extraction Template filter.
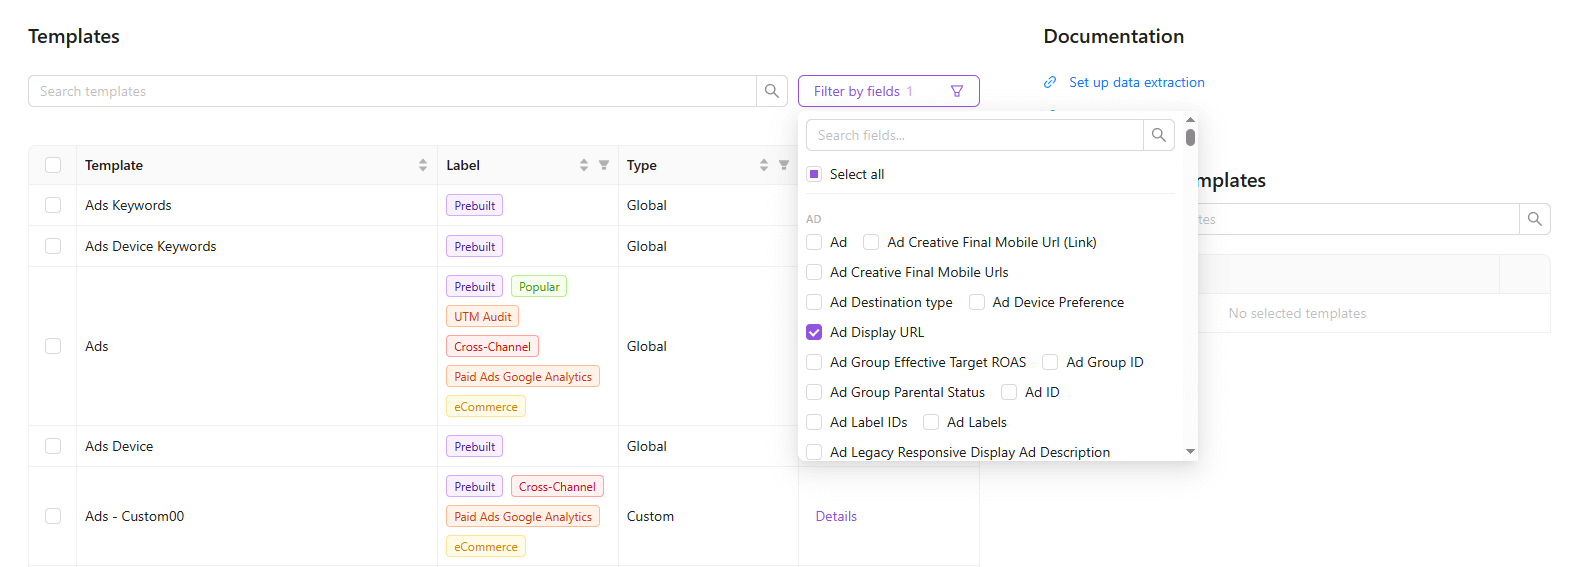
The filter works according to the AND logic. It means that the result extraction templates include all selected fields:
- Field_1 AND Field_2 AND etc.
Click on the Details to clarify the settings of a particular template. If you don’t have the necessary template, you can edit an existing one (only for custom templates) or click the Create a template button to a new one.
It is important to remember that you can not select all templates together. It depends on which global extraction template they are based on.
You can not select more than one template based on the same global extraction template. This restriction applies to both global and custom templates.

After selecting all the necessary templates, click the Continue button to move to the next step.
This button can be non-clickable in two cases:
- while the Selected templates list is empty
- if the resulting number of extraction orders exceeds 1000, you will see the following pop-up note: "The number of the selected orders cannot exceed 1000. You have enabled N orders for extraction".
Description:
Each account + extraction template pair will correspond to the extraction order. It means that there will be only one extraction order with one template and one account.
Let's say the total extraction orders number equals m*n where
- m is accounts number
- n is templates number
If m*n ≤ 1000 - the Continue button is clickable.
If m*n > 1000 - the Continue button is disabled.
Step 3. Configure Extraction Template
Extraction Template settings
Now you need to configure each selected template. You will see the sequential number of the current template on the left side of the page.
- Custom settings (depend on the data source)
- Sync historical data (mandatory for filling in)
- Week start day (weekly report types only)
Account-specific custom settings
Some custom settings require values that are specific to your connected accounts — for example, advertiser IDs or form IDs. For these settings, Improvado shows a selector instead of a plain text field. Click it to open a picker that loads the available values directly from your connected account, with search and pagination. You can select one or several values, depending on the setting.
If your extraction includes more than one account, values are configured per account — you can choose different values for each account, and the form shows which accounts are already configured and which still need a selection.
Note: Account-specific value pickers are currently available for a limited set of custom settings (for example, HubSpot Form GUIDs and Amazon Ads DSP advertiser filtering). For all other custom settings, you continue to enter values manually. We are expanding this to more settings over time.
You need to select the first date of the historical data interval. The maximum historical data depth varies due to the API specifics of different data sources. If you need historical data depth over the preset maximum value, it is necessary to raise a request via Improvado Service Desk. Our team will check if it is technically possible.
Also, if you have selected weekly report type, you can define the start day of the week (Sunday, Monday, etc.).
Note that you will be able to change it later by editing the extraction order configuration on the Settings tab.
Scheduling settings
Here you can set the frequency of data extraction by changing the scheduling settings and adding or deleting schedules.
One schedule is always created by default. You can add one or several more by clicking Add Schedule on the top right corner of this section. If this is not available, it means you have reached your limit. The contract determines the limit. To increase it, please get in touch with your Customer Success Manager.
Also, can delete the schedule by clicking the “trash bin” icon, but it is impossible to delete a schedule if it is the only one.
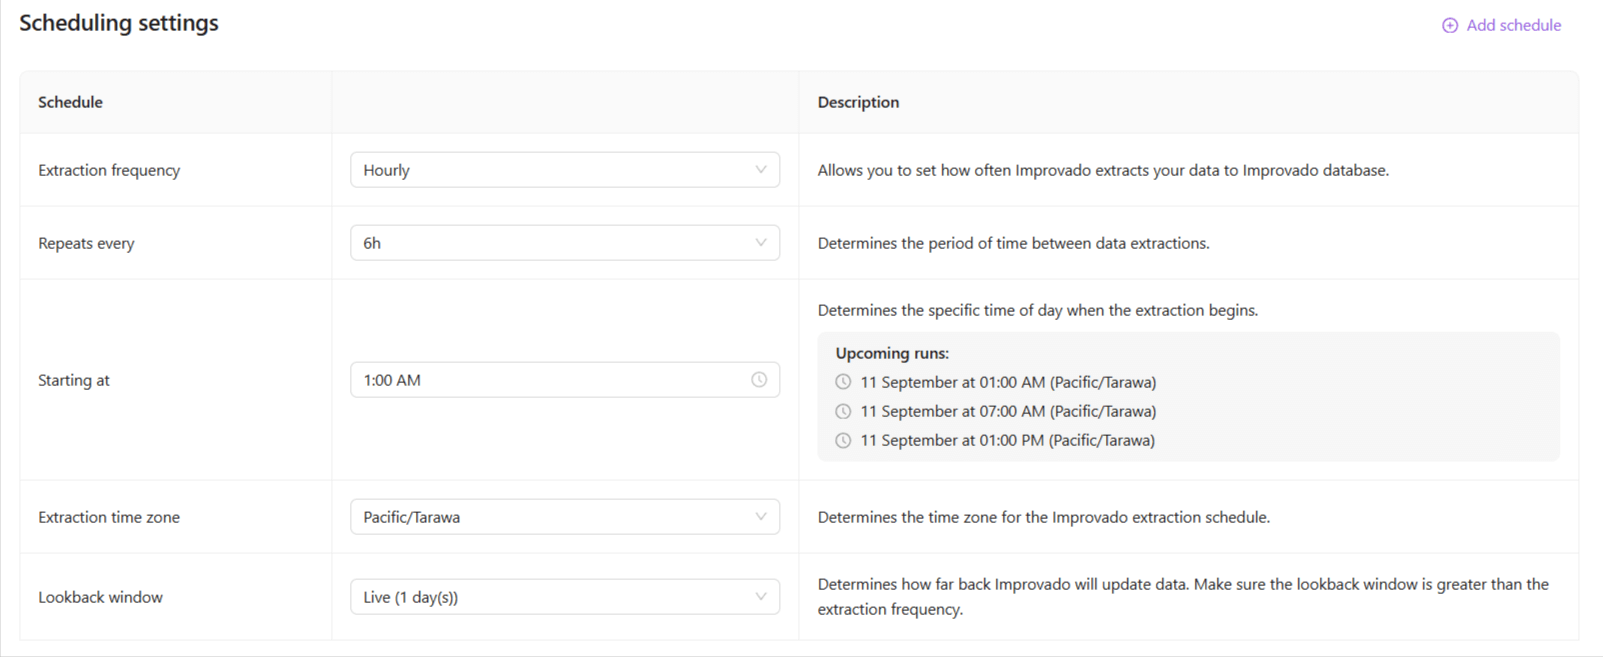
The schedule settings include four main fields, the additional fields depend on the chosen extraction period:
- Extraction period allows you to set how often Improvado attempt to load your data to Improvado database.
- Repeats every (hourly extraction period only) determines the period of time (in hours) between data extractions.
- Day of week (weekly extraction period only) determines the specific day of the week when the extraction begins.
- Day of month (monthly extraction period only) determines the specific day of the month when the extraction begins.
- Extraction time (Starting at in hourly extraction) determines the exact time for the Improvado extraction schedule. To the right of this settings field, you can see the average sync time for this report (daily extraction period only) and the time of the upcoming 3 runs.
- Extraction time zone determines the time zone for this extraction schedule.
- Lookback window is the period before data extraction, for which data is extracted regularly.
A warning message will appear if the scheduled extraction time exceeds the sum of your Data Delivery ETA and the average sync time (calculated as the median of the report’s dataflow duration over the past 60 days).
This notification helps avoid scheduling conflicts that could delay data delivery and result in SLA violations. The warning includes a recommended extraction time range based on historical sync performance for adjustments.
If you want to change your current Data Delivery ETA, you can edit it in the Organization Settings. Learn more.
Note that you will be able to change it later by editing the extraction order configuration on the Settings tab.
Extraction period
Now you have the option to schedule data extractions on an hourly basis (every 1, 2, 3, 4, 6, 8, or 12 hours), as well as daily, weekly (by selecting a specific day of the week), and monthly (by choosing a particular day of the month).
Note: Hourly schedule is available by request only. Please contact your Customer Success Manager for more details.
Lookback window
The following lookback window options are supported:
- Live: Covers the most recent data available.
- Default: The most optimal option that should cover enough data for analysis.
- Max: Allows for the maximum time range supported.
- Custom: Allows for custom range from 1 to Max option days.
This flexibility ensures that you can define a Lookback window that aligns with your specific reporting requirements.
IMPORTANT: Lookback windows for last day and last day (inc) extraction templates are not supported. If you have selected two or more global templates, the schedule settings of the first one will be applied to the following global templates, and then you can change them sequentially. This will not affect the custom templates settings.
Dimensions and metrics
Available dimensions and metrics are presented in lists similar to accounts and templates and work in the same manner.
A complete set of all fields provided by the API is available for the Custom Configuration only. You can learn more about the Custom Configuration configuration here.
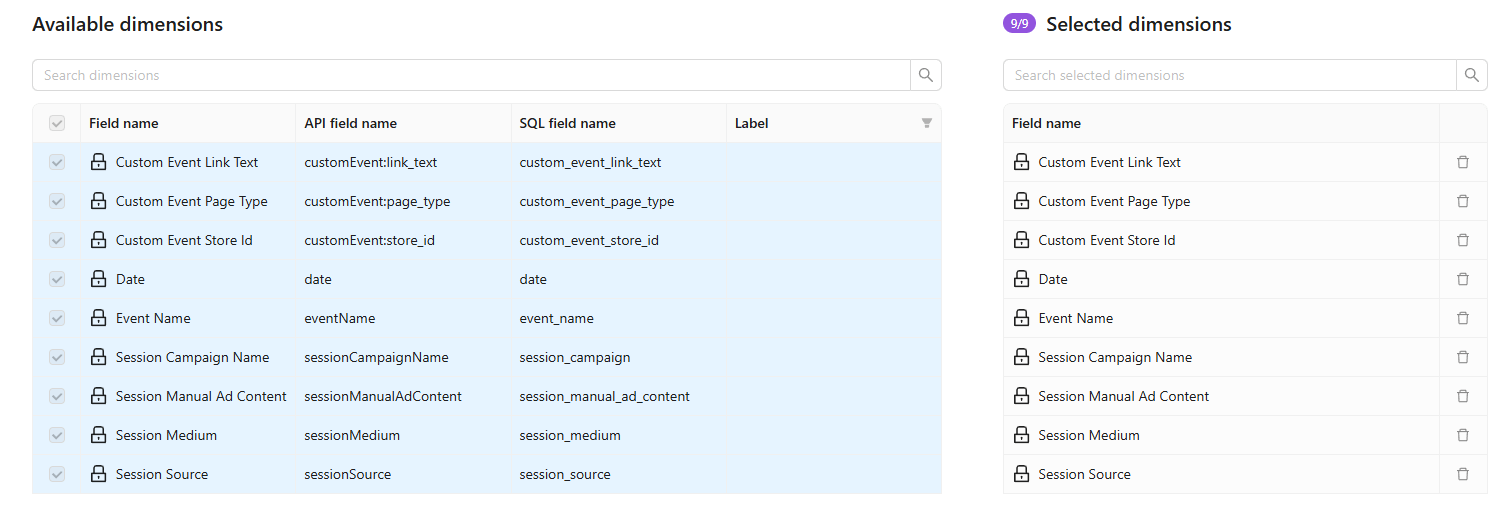
Some dimensions and metrics are selected by default. You can not deselect them because they define the data table structure.
Note: You can also remove selected fields by clicking the Bin button in the Selected dimensions/metrics list.
Data Table name
The Data Table name configuration can be found below the selection of dimensions & metrics - after defining the data schema.
Extraction Template
If all extraction templates are configured, click the Continue button to move to the last step and check the result. You cannot change your Data Table name.
Step 4. Check the result
This is the last step before the data extraction starts. Here you see the list of extraction orders you’ve configured on previous steps. It includes the following:
- Extraction order name
- It is formed by the Data Source — Extraction Template — Account rule
- Data Table name
- This name is formed by Data Source — Extraction Template rule
- Only one data table will be created for all accounts based on the same extraction templates
- Account Name
- Extraction Template Name
- By default is formed based on Parent Template — Custom rule
Check the resulting extraction orders carefully. If you notice that some order was added to this list by mistake, deselect it. Only selected extraction orders will be set up. Click the Continue button to finish the extraction configuration process.
Conflicted extraction orders
Сonflicted extraction orders may appear on the Step 4 if you are trying to set up extraction orders for existing configurations.
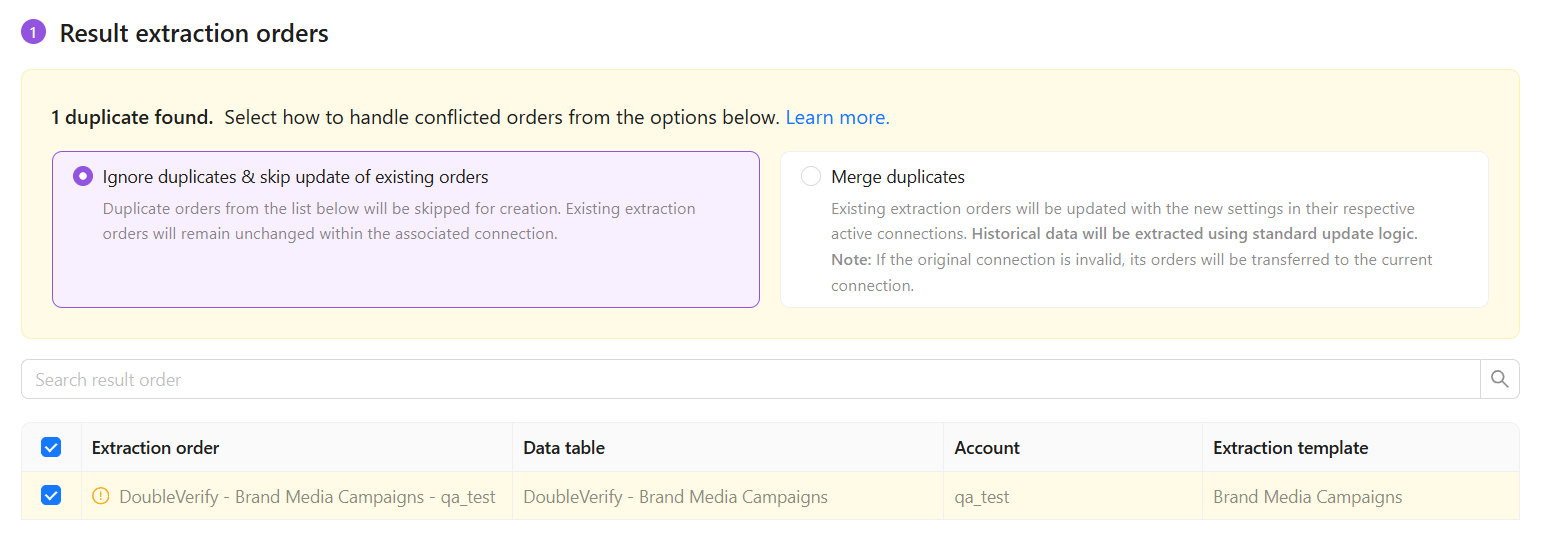
Two resolution actions are available:
- Ignore duplicates & skip update of existing orders
Duplicate orders from the list below will be skipped for creation. Existing extraction orders will remain unchanged within the associated connection. - Merge duplicates
Existing extraction orders will be updated with the new settings in their respective active connections. Historical data will be extracted using standard update logic.
Note: Duplicate orders associated with an invalid connection will be automatically transferred to the current connection.
Conflicted extraction orders will be displayed at the top of the extraction orders list. You can view the existing duplicate order by hovering over the info icon and clicking the provided link.