AWS S3 Destination
Note: This article covers AWS S3 Destination setup process. This guide doesn’t cover the DataPrep setup for AWS S3.
You can learn how to extract data from AWS S3 Data source here.
Description
AWS S3 is an object storage service that offers companies industry-leading scalability, data availability, security, and performance. This means that companies of all sizes can use it to store and protect data for a range of use cases, no matter the amount of data available.
Setup guide
Follow our setup guide to connect AWS S3 to Improvado.
Choose an encryption option
Choose a server-side encryption option:
- SSE-S3 (recommended) - server-side encryption with AWS S3 managed keys. Learn more.
- SSE-KMS - server-side encryption with AWS KMS keys. Learn more.
Make sure to give the required permissions for the AWS-managed key. - SSE-KMS with customer-managed key - server-side encryption with customer-managed AWS KMS keys. Learn more.
Make sure to give the required permissions for an encryption key. - No storage encryption - not recommended unless the AWS S3 bucket has default encryption.
Important: Make sure to provide your AWS S3 bucket information by following our guide.
Permissions
Enable the following permissions for your AWS S3 bucket:
s3:GetObjects3:PutObjects3:ListBuckets3:DeleteObject
Complete configuration
On the AWS S3 connection page, fill in the following fields:
- Enter a name for your Destination connection in the Title.
- Choose the Connection Option.
- Enter the AWS Access Key ID (only for Options #1 and #2).
- Enter the AWS Secret Access Key (only for Options #1 and #2).
- Enter the Assume Role ARN (only for the Option #3).
- Enter the AWS Region.
- Enter the Bucket Name.
- Enter the Folder.
- Select the File format option from the dropdown.
- Enter the File name.
- Enter the Max file size (MB).
- Select the Separator option from the dropdown.
- Select the Partition by option from the dropdown.
- Select the Encryption option from the dropdown. Learn more about all available encryption options here.
- (SSE-KMS with customer-managed key) Enter the Encryption Key.
- Select whether you want to Use load by account for this Destination.
- Select the necessary Use binary strings option from the dropdown.
How to provide credentials to Improvado
There are three different ways to provide your credentials that you can choose depending on your security requirements and the type of selected Server-Side Encryption:
| Connection option | Self service | SSE-S3 | SSE-KMS (AWS managed key) | KMS (Customer managed key) | No storage encryption |
|---|---|---|---|---|---|
| Option #1: Create a user in your AWS account for Improvado | ✅ | ✅ | ✅ | ✅ | ✅ |
| Option #2: Share Read and Write access with Improvado’s AWS account | ❌ | ✅ | ❌ | ✅ | ✅ |
| (Recommended) Option #3: Provide access via Cross-Account AWS IAM Role Chaining | ✅ | ✅ | ✅ | ✅ | ✅ |
Option #1 (Create a user in your AWS account for Improvado)
Available for SSE-S3 and SSE-KMS (with AWS-managed and customer-managed keys) only.
Create a user in your AWS account for Improvado and enter the following information in Complete configuration:
- Bucket Name
- AWS Access Key ID
- AWS Secret Access Key
- AWS Region
Make sure to enable the following permissions for your AWS S3 bucket.
Option #2 (Share Read and Write access with Improvado’s AWS account)
Available for SSE-S3 and SSE-KMS (with customer-managed keys) only.
Important: If you’re gonna use this option - notify our Support or your CSM about it and we will create specific users to load data and provide support. We’ll create a Destination connection for you.
Share Read and Write access with Improvado’s AWS Account ID:
- Create an AWS S3 bucket.
- Select the Permissions tab on the Bucket Settings page.
- In the Bucket policy, click the Edit button.

- Copy & paste the Policy example below.
- Change
your-bucket-nameto your real Bucket name. - Change
112233445566to the following value depending on the server you are using: - Main server:
716309063777. - EU server:
787401325475. - US server:
939673193049.
{
  "Id": "Policy1569503459134",
  "Version": "2012-10-17",
  "Statement": [
      {
          "Sid": "S3Access",
          "Action": [
              "s3:GetObject*",
              "s3:DeleteObject",
              "s3:ListBucket*",
              "s3:PutObject*",
              "s3:ListBucketMultipartUploads",
              "s3:ListMultipartUploadParts",
              "s3:AbortMultipartUpload"
          ],
          "Effect": "Allow",
          "Resource": [
              "arn:aws:s3:::your-bucket-name",
              "arn:aws:s3:::your-bucket-name/*"
          ],
          "Principal": {
              "AWS": [
                  "112233445566"
              ]
          }
      }
  ]
}
- Save changes.
- If you use SSE-S3, then provide your AWS S3 bucket information to Improvado (Option #2).
If you use SSE-KMS, you have to share access to your KMS key using one of the methods below:
Note: AWS allows sharing only customer-managed KMS keys (keys that you created). The AWS-managed KMS key (the key that was created by AWS automatically) cannot be shared.
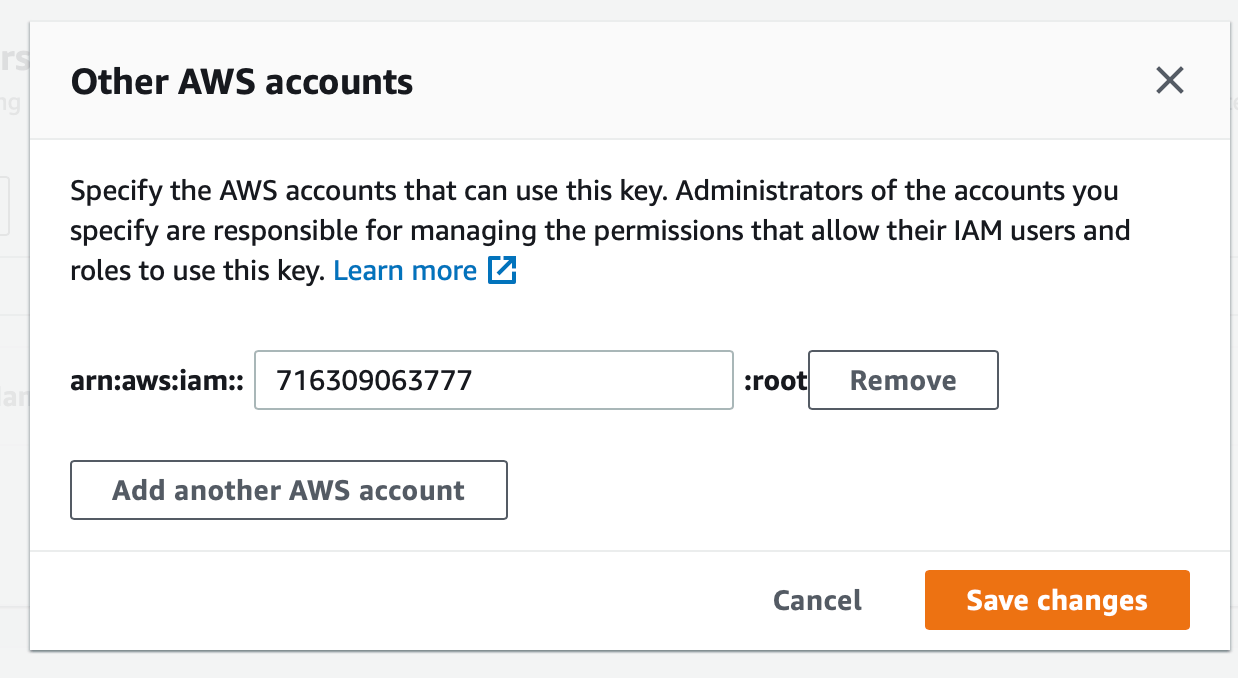
Method 1 (Add Improvado’s AWS account to KMS Key settings)
The KMS Key ID is required.
- Create a KMS key.
- Open the Key settings.
- Go to Other AWS accounts and click the Add other AWS account button.

- Paste Improvado’s AWS account ID:
716309063777.
- If you are using the EU server, please share access with Improvado’s EU AWS account ID:
787401325475. - If you are using the US server, please share access with Improvado’s US AWS account ID:
939673193049.
Method 2 (Add Improvado’s AWS account ID to your KMS Key policy)
The KMS Key ID is required.
- Create a KMS key.
- Open the Key settings.
- In the Key policy tab, click the Switch to policy view button.

- Click the Edit button.

- Copy & paste the Policy example below.
- Change
example-region-1to real key Region. - Change
123456789098to your real Account ID. - Change
111aa2bb-333c-4d44-5555-a111bb2c33ddto real Key ID. - Change
112233445566to the following value depending on the server you are using: - Main server:
716309063777. - EU server:
787401325475. - US server:
939673193049.
{
    "Version": "2012-10-17",
    "Statement":
    [
        {
            "Sid": "Enable IAM User Permissions",
            "Effect": "Allow",
            "Principal": {
                "AWS": "arn:aws:iam::123456789098:root"
            },
            "Action": "kms:*",
            "Resource": "*"
        }
        {
            "Sid": "Allow use of the key",
            "Effect": "Allow",
            "Principal": {
                "AWS": "arn:aws:iam::112233445566:root"
            },
            "Action": [
                "kms:Encrypt",
                "kms:Decrypt",
                "kms:ReEncrypt*",
                "kms:GenerateDataKey*",
                "kms:DescribeKey"
            ],
            "Resource": "arn:aws:kms:example-region-1:123456789098:key/111aa2bb-333c-4d44-5555-a111bb2c33dd"
        }
    ]
}
Provide your AWS S3 bucket information to Improvado (Option #2)
Provide our Support Team or your CSM with the following information:
- Bucket Name
- AWS Region
- KMS Key ID
Our team will create specific users to load data and provide support.
Option #3 (Provide access via Cross-Account AWS IAM Role Chaining)
This option uses the chain of AWS IAM roles: Improvado role assumes the customer’s role, which has access to S3 and (optionally) to KMS.
We highly recommend selecting this option, as it is the most secure and is 100% self-serve, without the need to wait for our support team to configure a connection.
Supported encryption types:
- SSE-S3 - server-side encryption with AWS S3 managed keys.
- SSE-KMS - server-side encryption with AWS-managed KMS keys.
- SSE-KMS with customer-managed key - server-side encryption with customer-managed AWS KMS keys.
- No storage encryption - not recommended unless the AWS S3 bucket has default encryption.
Implementation steps:
- Create an AWS S3 bucket and KMS Key (if needed).
- Create a role in the AWS IAM.
- The role should have read and write permissions on the S3 bucket and (optionally if you use KMS encryption) usage permissions on the KMS key:
{
    "Statement": [
        {
            "Sid": "RWPolicy",
            "Action": [
                "s3:GetObject*",
                "s3:DeleteObject",
                "s3:PutObject*"
            ],
            "Effect": "Allow",
            "Resource": "arn:aws:s3:::your-bucket-name/*"
        },
        {
            "Sid": "ListPolicy",
            "Action": [
                "s3:ListBucket"
            ],
            "Effect": "Allow",
            "Resource": "arn:aws:s3:::your-bucket-name"
        },
        {
            "Sid": "OptionalKMSUsagePolicy",
            "Action": [
                "kms:Encrypt",
                "kms:Decrypt",
                "kms:ReEncrypt*",
                "kms:GenerateDataKey*",
                "kms:DescribeKey"
            ],
            "Effect": "Allow",
            "Resource": "arn:aws:kms:region:123456789:key/111aa2bb-2c33dd"
        }
    ],
    "Version": "2012-10-17"
}- replace
<strong>your-bucket-namewith your S3 bucket name. - you can allow to put/get/delete objects in some prefix (path or directory) of the S3 bucket instead of the whole S3 bucket. In this case the Resource format in the
"RWPolicy"will be"arn:aws:s3:::<strong>your-bucket-name</strong>/<strong>path_prefix</strong>/*". - replace the
<strong>region</strong>with your KMS key Region (i.e.us-east-1). - replace the 123456789 with your AWS Account ID.
- replace the 111aa2bb-2c33dd with your KMS Key ID.
- Select Provide access via Cross-Account AWS IAM Role Chaining as Connection Option on the Improvado UI.
- Provide your role ARN in the Assume Role ARN field.
- After entering all the information in the authorization form, copy the Policy and paste it into the Trust policy (Assume role policy) for the role you just created:
.png)
Please note that ExternalID for assume role is set only for the current workspace by default.
You can specify multiple workspaces if needed:
"sts:ExternalId": [
	"<agency_uuid>_<workspace_id>",
	"<agency_uuid>_<workspace_id2>",
	"<agency_uuid>_<workspace_id3>"
]
Or even for all workspaces in your agency:
"sts:ExternalId": "<agency_uuid>_*"But the recommended option is to have ExternalID for a specific workspace only.
- Click Continue to check the configuration and create a destination connection.
Additional information
Folder
Possible parameters:
/{{workspace_id}}/{{workspace_title}}/{{data_source}}/{{data_table_title}}/{{report_type}}/{{filename}}/{{account}}/{{dataclass}}/{{YYYY}}/{{MM}}/{{DD}}
{{workspace_id}}and{{workspace_title}}are optional parameters that provide additional information about the workspace used for a destination connection{{data_source}}is a data provider, integration, connector.{{data_table_title}}is an object that contains all extraction orders with the same granularity (dimensional schema).{{report_type}}is a set of such fields as metrics, properties, dimensions, etc.{{account}}- is an optional parameter that allows you to to add specific account for the data load.- You must enable Use load by account field to add this parameter to the File name.
- If you use
/{{YYYY}}/{{MM}}/{{DD}}settings, the data will be added to folders daily. Each new record will not delete the previous one, even for data that contains no date.- You can use
DD_today,MM_todayandYYYY_todayinstead ofDD,MMandYYYYto use today’s date in the folder name. E.g.,/{{workspace_id}}/{{workspace_title}}/{{data_source}}/{{report_type}}/{{YYYY_today}}/{{MM_today}}/{{DD_today}}will be resolved to/ws1/main_group/ds1/rt1/2025/07/01
- You can use
Data structure of S3 storage by Improvado. You can create a request to the Support Team to add support for different folder structures in a bucket.
File format
Possible formats:
- csv
- csv+gzip
- json
- json+gzip
- parquet
- avro
File name
Possible parameters:
{{data_source}}-{{report_type}}-{{data_table_title}}-{{filename}}-{{account}}-{{dataclass}}-{{YYYY}}-{{MM}}-{{DD}}-{{timestamp}}
{{filename}}- is the same as destination table name{{account}}- is an optional parameter that allows you to to add specific account for the data load.- You must enable Use load by account field to add this parameter to the File name
IMPORTANT: you cannot use {{DD}} for partition by month
{{filename}}-{{YYYY}}-{{MM}}-{{DD}}– for partition by day- You can use
DD_today,MM_todayandYYYY_todayinstead ofDD,MMandYYYY, to use today’s date in the final file name. E.g.,{{ filename }}-{{ YYYY_today }}{{ MM_today }}{{ DD_today }}T{{ H }}{{ M }}{{ S }}will be resolved tosome_name-2025-07-07T121517
- You can use
{{filename}}-{{YYYY}}-{{MM}}– for partition by month
{{YYYY}}/{{MM}}/{{DD}} partitioning is based on a date field in the exported data. If the dataset does not contain an actual date field (for example, no “date” column/field), these partition values cannot be derived and date-based partitioning will not work as expected. In that case, use {{YYYY_today}}/{{MM_today}}/{{DD_today}} to partition by the export run date instead.
{{YYYY}}/{{MM}}/{{DD}} refer to the record’s date-based partition values (if applicable), while {{YYYY_today}}/{{MM_today}}/{{DD_today}} always use today’s date.
Also, you can use “_” instead of “-” or do not use any symbols at all, for example:
{{filename}}_{{YYYY}}-{{MM}}-{{DD}}{{filename}}{{YYYY}}{{MM}}{{DD}}
You can use {{chunk_id}} if you've have file size limit enabled for your destination.
For example, file format like {{filename}}-{{YYYY_today}}-{{MM_today}}-{{DD_today}}-{{chunk_id}} will result in files with this format:
test-2025-07-07-00001.parquettest-2025-07-07-00002.parquet
This feature is currently available by request only and only for parquet file format.
Max file size
Determines the max file size of a chunk. This requires adding {{chunk_id}} in the File name.
Separator
Possible delimiters that can separate data in your file:
- comma
- semicolon
- tab
Partition by
Possible ways of splitting data:
- Day
- Month
Connection Health Checks
Improvado periodically verifies that your S3 connection is active and properly configured. During this check, a temporary test file is created in your bucket path and immediately deleted. This is standard practice across data integration platforms and ensures that the provided credentials still have the required read/write permissions.
The s3:DeleteObject permission is required to clean up the test file after the check. If this permission is not granted, the test file will remain in your bucket.
Was this article helpful?
Thanks for the feedback!